Oct 1, 2012
fall is here and i love it! for us that means a lot of nights hanging out around a fire with family & friends and “pudgy pies.” i love pudgy pies, not necessarily because they are gourmet meals, but because of the experience of making them and the memories they trigger of fun evenings around a fire with friends.
the pudgy pie below were made when we were hanging out on my husband’s families’ farm. his mom, created an entire gluten-free pudgy pie station and scrubbed down the cast-iron pudgy pie makers for us. our little boys loved them and the experience.
so what’s in our pudgy pies?
we like to make pizza ones:
- 2 slices of gluten-free, egg-free homemade bread (buttered – use earth balance or coconut oil for dairy-free)
- pizza sauce (our favorite is muir glen organic pizza sauce
 )
)
- browned ground beef or sausage
- pepperoni (our favorite is applegate farms)
- topped with raw sharp cheddar cheese
another favorite is to actually make dessert ones filled with pie filling (cherry or apple are my favorites).

bread is core to a pudgy pie…so what do i do when we need gluten-free, egg-free bread?
we eat so little gluten free bread, that i rarely buy any, unless i am in a major pinch and need it fast (but even then, they aren’t usually egg free for my son). there are a lot of gluten free breads on the market and they are getting better, but i honestly don’t love any of them and most have egg in it. early on in my gluten free days, i did eat millet & flax seed bread made by sami’s bakery, but unfortunately because of cross-contamination issues in their bakeries, it isn’t safe for me or any celiacs. i hope that some day they get their act together, because i really did like their products.
because we eat bread so little, i typically will just make my own. i have a millet flour one that we like (i promise to share that recipe at some point), but a lot of times i am throwing stuff in the bread maker at the last minute, so when that happens i use bob’s red mill gluten-free homemade wonderful bread mix . it is easy, and quick and makes a pretty good gluten free loaf in a bread maker. i follow the instructions on the bag (except, for the egg and i use almond milk or flax milk in it). for this particular bread, i make 2 flax seed eggs {6 Tbsp water, 2 Tbsp. ground flax seed, and about a tsp. of coconut oil), but then i also add 1 heaping Tbsp of chia seeds right to the dry mix in the bread machine.
every bread maker is different. mine actually has a gluten-free setting on it, but i feel like that never quite gets the bread cooked, so i always add 10-15 minutes of baking time at the end of the cycle. you don’t want to undercook gluten free bread…it will just collapse.
if anybody has any other, quick fool proof bread recipes, i would love to try them!


Sep 4, 2012
i love our boys’ preschool (today is our youngest, first day ever going). i love the socialization they get from it, love the creative activities they engage in and their teacher’s absolutely love on them. plus, it gives me a much needed 8 hours a week to work, schedule client meetings, run errands or even just meet my husband for a kid-free lunch out (we celebrated today and met at coopers hawk – they have a fantastic gluten-free menu and my cobb chicken salad was delicious)
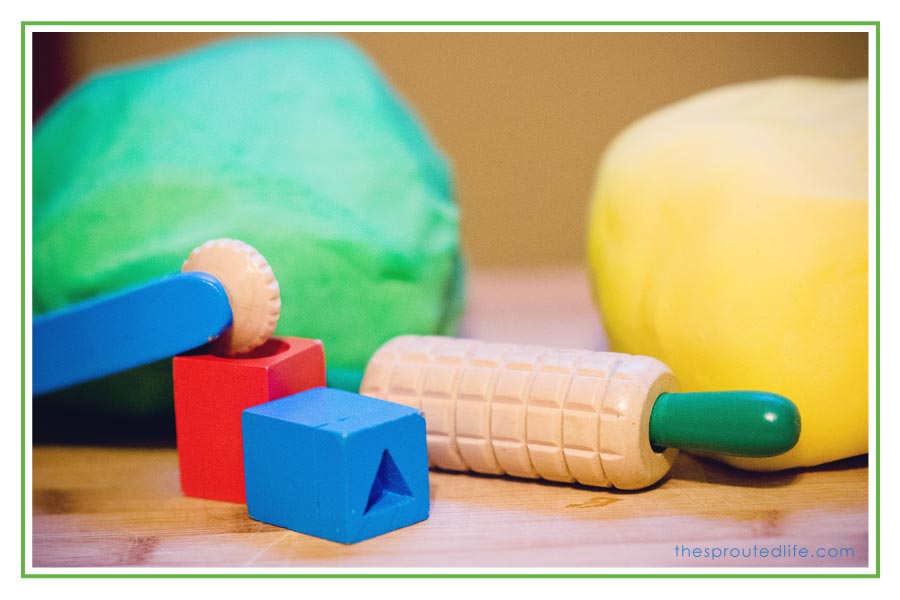
last night, i was the mom running around in circles, filling out all my little boys preschool paperwork, loading backpacks, labeling supplies, packing lunches and of course, making gluten-free play-dough! i love play-dough, my kids love play-dough, but i don’t love the wheat it is made out of. anybody with gluten free kids, knows the pain of play0dough. you can buy gluten free play-dough, but it is pretty pricey, and since i am making it for 2 kids for home, preschool & church classrooms, making our own is much more budget friendly and it’s pretty simple too.
{we have used the store-bought, soy-yer dough, and my kids loved it also + it is an indiana local small business, so i like that too.}
here are a few tricks i have learned from making many batches:
- most recipes say to heat on low while stirring until play-dough pulls away from pan…i have found that of you start on medium to high heat and let it heat faster until it starts to stick, than reduce to low, it turns out less sticky. (i don’t know why this helps, but it does…just be careful not to burn it.)
- gluten-free play-dough will become less sticky as it starts to cool down.
- if it remains sticky after it starts to cool, keep kneading in cornstarch until it is the desired consistency.
- i always knead my food coloring in at the end as it is cooling…the times i added it to the original ingredients, i get a sticky mess.
- i always make it in small batches and then combine if i want larger amounts of each color. big batches, just don’t seem to work as well.
| gluten free play-dough |
#ratingval# from #reviews# reviews
|
Print
|
- ¾ cup white rice flour
- ¾ cup cornstarch (you can use arrowroot for kids with corn allergies)
- ¾ cup iodized salt
- 1 Tbsp. cream of tartar (I always do a heaping Tbsp.)
- 2 tsp. grape seed or olive oil
- 1 ½ cups hot water
- food coloring if desired
- in a pot, combine all of the dried ingredients, the oil & hot water.
- turn on the heat to med-high and begin stirring.
- as soon as the ingredients start to stick a little, reduce the heat to low and continue stirring.
- play-dough will begin to form a ball and pull away from the edges (typically, about 3-4 minutes).
- remove from heat and place ball into glass bowl and allow to cool a little.
- once the play-dough is cool enough to handle, you can knead in food coloring if desired.
- if it is too sticky, knead in a little cornstarch until you reach desired consistency.
- it does become less sticky as it cools.
- store in an airtight container or ziploc bag.
2.2.6
here are a few photos of my little guys before we headed of to preschool this morning. my youngest was not sure about the heavy back pack he was wearing!
note on lunches: {i promise i will share this year some of what my boys eat for school…we are using the goodbyn eco-system this year}


Aug 18, 2012
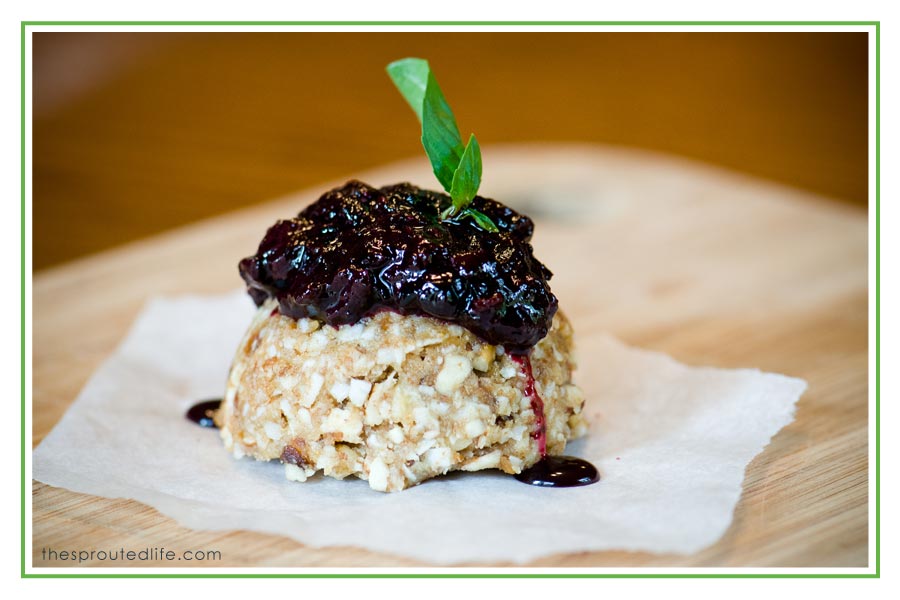
random note: {i have been a terrible blogger…i am just going to blame it on moving and move on! i actually made this dessert a few weeks ago and it was amazing!..so i am finally sharing it}
in our csa share a few weeks ago, we got a huge bunch of basil and lots of blueberries. i love basil, but I have been running out of ideas and inspiration on how to use it. i have made enough tomato and basil recipes in the last few weeks! so i went hunting for ideas and absolutely loved the result. it is completely inspired & adapted from two different recipes, from two different indianapolis local bloggers, who i really repect.
The base for the nut truffle was inspired by the recipe from the {summer berry bars} by lindsey at enjoyinghealtlyfoods. i didn’t have any walnuts on hand, so i used pecans, added some vanilla and decided to turn them into individual truffles. the sauce for the topping was based off of {the old-fashioned blueberry-basil preserves} from katy at katyshecooks. her take on lacto-fermented blueberry-basil preserves was very intriguing to me, but I didn’t have any whey (plus, i am dairy-free again) and I didn’t figure fermenting with sea salt would work on this recipe. {maybe it would? maybe it would make it to salty? thinking about trying it…but really i was just impatient and wanted something that evening for dessert}.
the end result, turned out to be these cute little desserts that had an amazing combination of flavors. we will definitely be making these again. the nut truffle bases could handle a bunch of different sauces. I think chocolate and raspberry may be a good combination to try next.
| nut truffle with blueberry-basil sauce |
#ratingval# from #reviews# reviews
|
Print
|
Recipe Type: gluten free dessert
- 1 cup pecans (i soak, sprout & dehydrate mine)
- ½ cup unsweetened shredded coconut
- ½ cup almond flour
- 8 dates (pitted & soaked in water for 1 hour)
- ¼ cup coconut oil
- 1 tsp. vanilla (almond extract would work also)
- ……………………
- 2 cups blueberries
- 1/3 cup raw honey
- 1 tsp. sea salt
- ¼ cup. chopped basil
- 1 tsp. lemon juice
- ½tsp. gelatin (or another thickening agent)
- crush pecans in a food processor and then add coconut and almond flour and pulse until desired consistency.
- add in coconut oil, dates and vanilla and process until well incorporated.
- using a ¼ cup cookie baller (big melon baller), scope out nut mixture, pressing each one tightly in scoop.
- place truffles on parchment paper and refrigerate until ready to serve.
- in a small saucepan cook 1 ½ cup of blueberries, honey & sea salt. bring to a simmer and let reduce down (approx. 5-10 mins).
- allow to cool slightly
- in food-processor add cooked blueberry mixture, remaining blueberries, lemon juice & basil and puree until smooth.
- serve truffles topped with warm blueberry-basil sauce!
shared on: pennywise platter, food renegade, slightly indulgent tuesday, & simple lives thursday
Jul 23, 2012
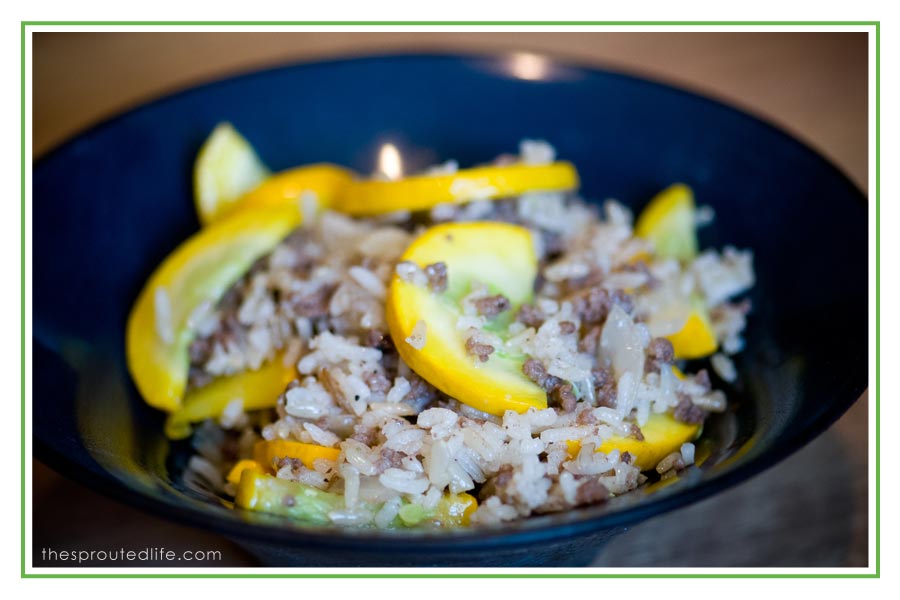
it’s moving week in our house! it feels like we have been prepping to move forever. we are temporarily moving into a basement apartment (8-12 weeks) so most of our stuff has to go into storage…which has made packing a little more challenging. needless to say, this week will be full of simple quick meals! i am still trying to eat down our pantry & freezer and every ingredient in this dish i had on hand. (the onions and yellow squash were from our CSA share last week).
we don’t eat a ton of gluten free grains, but the four main ones that we still incorporate into meals are rice, corn, quinoa and some gf rolled oats. one thing i am pretty strict on is what i cook my rice and quinoa in. i very rarely just cook it in water, but instead always try to use homemade bone broth (i freeze it in big batches). i could write a huge long post on the benefits and nutrients packed into bone broth (and after this move, i will). i drink a big mug of it everyday, but getting it into my kids is fairly challenging. i have found that cooking grains and other dishes in it, is a fool proof way to get some broth into my family’s diet. here is my quick: beef, rice and yellow squash skillet dish!
| beef, rice & yellow squash skillet dish |
#ratingval# from #reviews# reviews
|
Print
|
Author: the sprouted life
- 2 cups bone broth (i used beef)
- 1 ½ cups brown rice
- 1 lb. grass-fed beef
- 2 Tbsp. coconut or olive oil
- ½ yellow onion (diced finely)
- 3 garlic cloves
- 3 yellow squash
- salt & pepper to taste
- cook rice in bone broth (i use a rice steamer, but can easily be done on stovetop)
- in a skillet, sauté diced onion & crushed garlic in 1 T. coconut oil.
- when onion becomes translucent, add in beef and cook until brown.
- toss in sliced yellow squash and cook down for 2-3 minutes on medium heat.
- when squash becomes slightly soft add in the cooked rice, remaining coconut or olive oil.
- mix together well and add in salt & pepper to desired flavor
- serve!
2.2.6
Jul 12, 2012
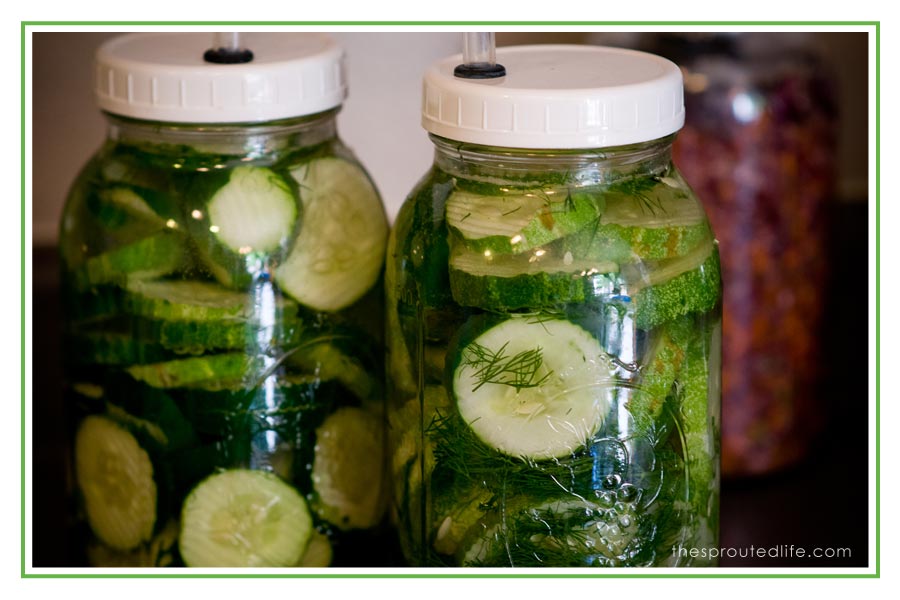
i am super excited about my 3 new jars of veggies that are fermenting on my counter right now. we got some yummy pickling cucumbers and a beautiful head of red cabbage in our CSA share last week, so i knew i needed to try some new recipes with them. i have two types of cucumbers recipes turning into lacto-fermented pickles, one is a pretty simple garlic-dill and the second has more kick with some cayenne and red pepper flakes. i will hopefully be sharing the recipes in a few days when they are done (i have no clue how they are going to taste). i also made a batch of garden dill fermented veggies, featuring red & green cabbage, a cucumber, carrots, garlic and dill. dont’ they look pretty! i can’t wait to try them.
also, this week i have been busy freezing blueberries. we try to freeze 50-70 lbs each summer and typically those won’t make it through the whole year, but that really is about all the freezer space i can give up. i wash and dry them and then flash freeze them on cookie sheets before putting in containers. we love blueberries in this house!

Jul 6, 2012
i have been a horrible blogger. between a much needed mini-vacation to the beach/dunes in michigan, shooting weddings, a large pile of design work, canning a ton of peaches (in the 95 degree heat), house & land closings and now packing for our first move to temporary housing…i have been a little busy. never fear, my husband and i have still been cooking a ton and trying to keep healthy, nourishing meals in front of our family during this busy season of our lives. so, my little blog has suffered a bit, but i do have a bunch of recipes to share (i just need to find the time to share them).
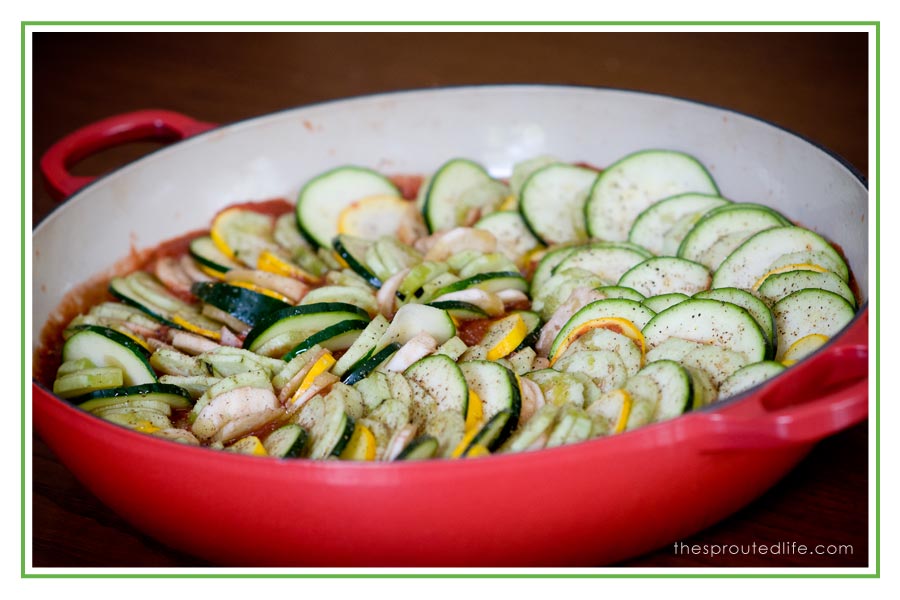
here is a family favorite side dish. our csa share last week was just screaming for me to make ratatouille from it. i had these amazing onions, a huge bunch of fresh basil, a few varieties of japanese eggplant, zucchini and yellow squash! i know this is nowhere near how traditional french ratatouille is made, but this is easy, quick and still has amazing flavor! the only main items used in this dish that were not fresh from our csa were the crushed tomatoes & garlic cloves. that makes me happy!
the picture is right before the ratatouille went into the oven.
side note: a lot of ratatouille recipes include red or yellow bell peppers in them. i think that they would make a wonderful addition. i just didn’t have any.
| simple summer ratatouille |
#ratingval# from #reviews# reviews
|
Print
|
Recipe Type: side dish
Author: the sprouted life
simple side dish, with a wonderful array of flavors!
- 2 japanese eggplants (i peeled mine)
- 2 medium zucchini
- 2 medium yellow squash
- 1 small yellow onion
- 1 can of organic crushed tomatoes
- 3 cloves of garlic
- handful of basil
- 2 Tbsp. olive oil
- sea salt to taste
- ground black pepper to taste
- parchment paper
- peel eggplant if you want (this is not necessary) and then trim ends off of the eggplant, zucchini and yellow squash
- slice the vegetables thinly, using a mandolin or knife (mine were between 1/16th and 1/8th in thickness)
- set vegetables aside
- in a food processor or vita-mix puree the canned tomatoes, basil and garlic
- layer a thin layer of sliced onions on the bottom of a baking dish
- pour tomato mixture on top of the onions and spread evenly
- starting on the outside, begin layering the eggplant, zucchini & yellow squash into the tomato sauce all the way around the pan
- drizzle with olive oil
- sprinkle with sea salt & ground black pepper
- cut parchment paper to fit baking dish
- cover loosely with parchment paper and bake at 375 for approx. 1 hour
- vegetables should be fully cooked, but not mushy.
2.2.6
items used in this recipe:
shared on: food renegade