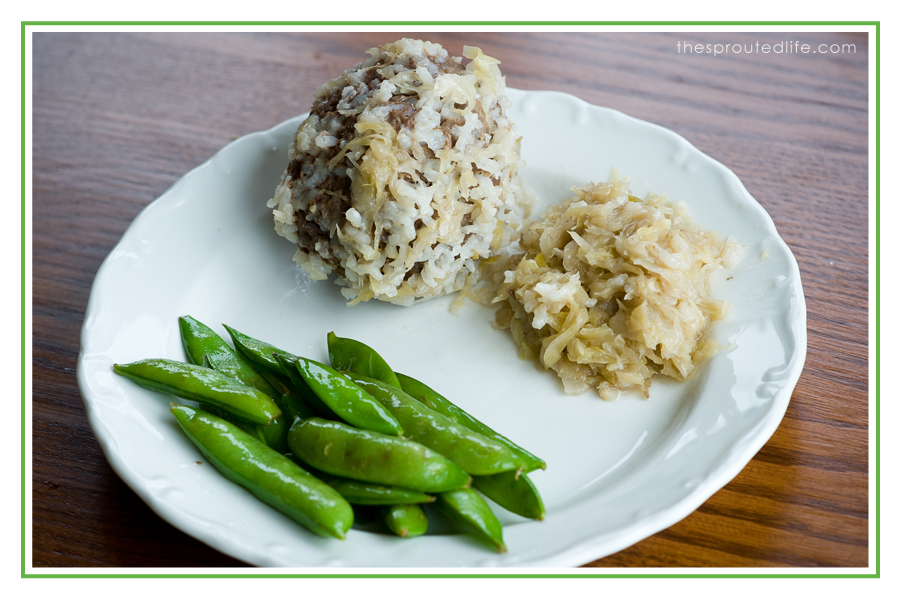
We are in full swing of a new schedule this year, as my oldest started kindergarten in August. I am not the most scheduled person and am learning to adapt to a set daily schedule, while trying to balance a 3 year old (who misses his big brother), a super active 1 year old and my freelance design work, yet still make sure that I am feeding my family well. I am also now having to think ahead about packing lunches five days a week (lunch in our house is almost always dinner leftovers). Hearty, filling dishes that I can prep in my pockets of free time are now the main items on our dinner menu. I thought I would share a family favorite today. Their is nothing wildly original about this recipe (I learned it from my mother-in-law). It is simple and straight forward, yet delicious and filling and I can pack it the next day in my son’s goodbyn for lunch.
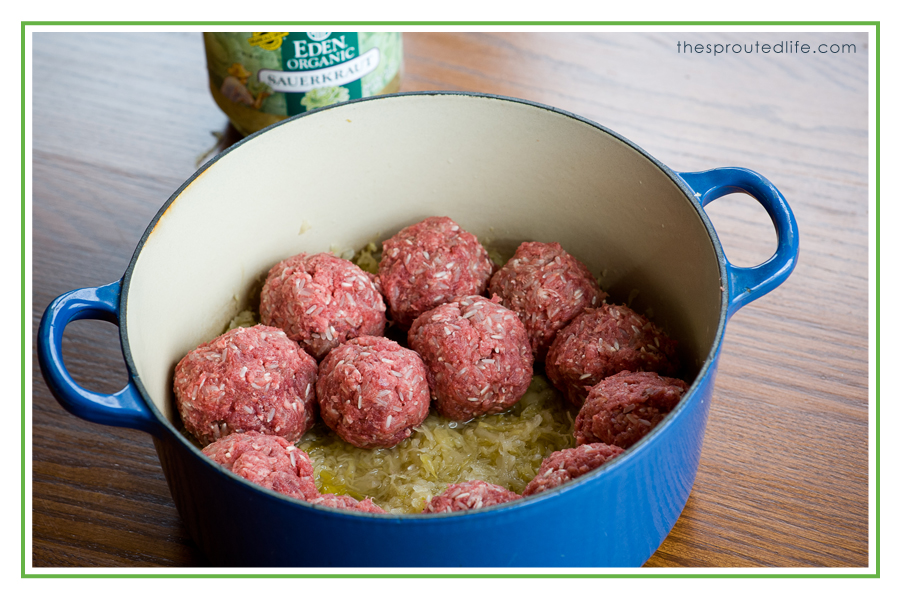
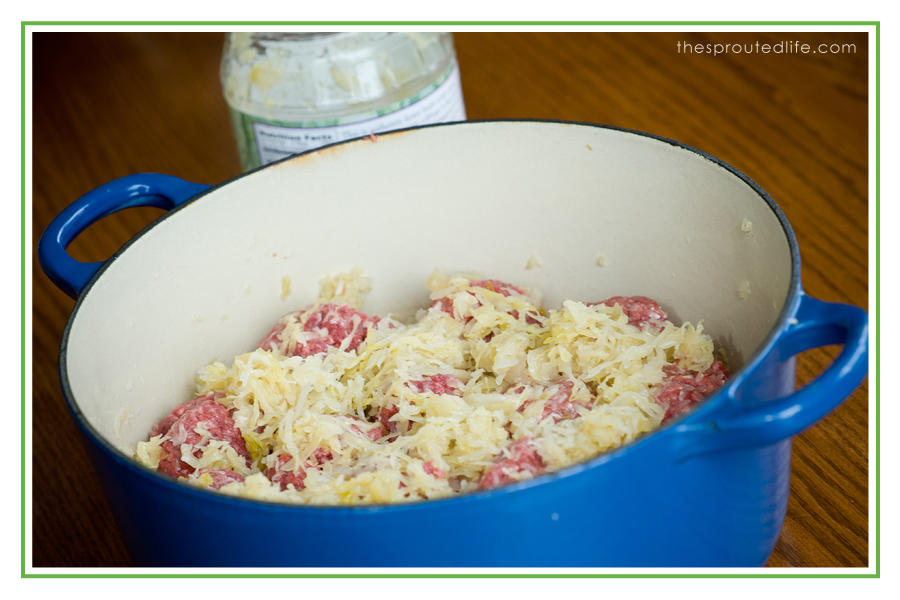
It is so simplistic that the ingredients are usually just ground beef, rice and sauerkraut. Our local EarthFare has been having their grass-fed ground beef on sale fairly often, making this dish even more affordable. Because their grass-fed ground beef is so lean, I have been adding a pound of ground pork to the recipe. My favorite sauerkraut for this recipe is Eden Organic. I have been making this dish up in the morning, and then just pulling it out of the fridge and popping it on the stove an hour before dinner.
Sauerkraut and Meatballs – A Gluten Free Family Favorite
Recipe Type: Main Dish
Author: The Sprouted Life
Ingredients
2 lbs of grass-fed ground beed
1 lb ground pork
1 jar of sauerkraut
1 cup of white rice (we prefer Lundberg Organic Basmati)
1/2-1 cup of water or beef broth
Salt & pepper to taste
Instructions
Combine ground beef, ground pork, one cup of rice and a pinch of salt and pepper
Layer bottom of a heavy dutch oven with sauerkraut
Roll handful size meatballs and layer the bottom of the pan, then add another Layer of sauerkraut and add in remaining meatballs
Top with remaining sauerkraut.
Pour about a cup of water or beef broth in the pan (this varies a little with how much liquid was in the jar of sauerkraut)
Cover and cook on stove at medium/medium high heat for about an hour. It will be simmering pretty good and I always check it halfway through to make sure there is enough liquid in the pan for the rice to absorb.
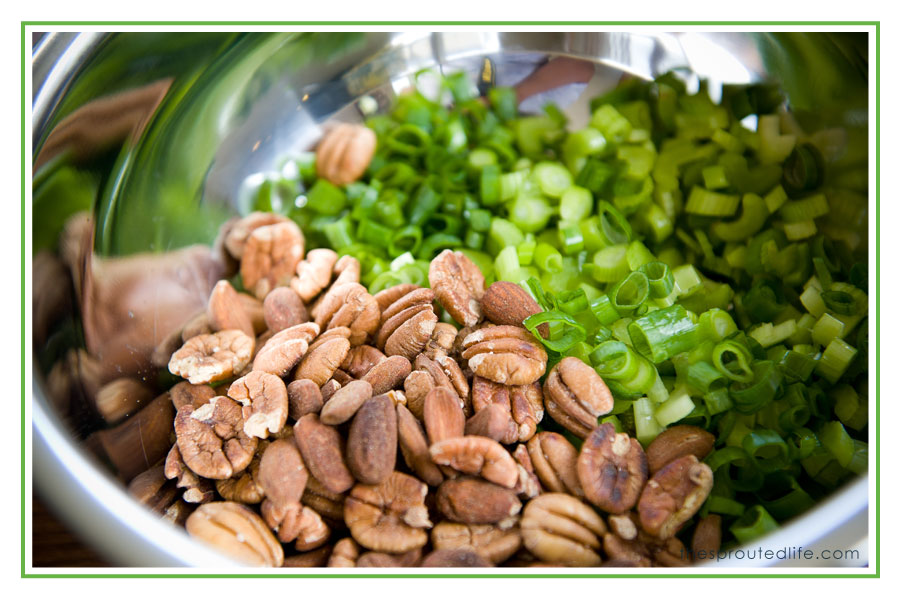
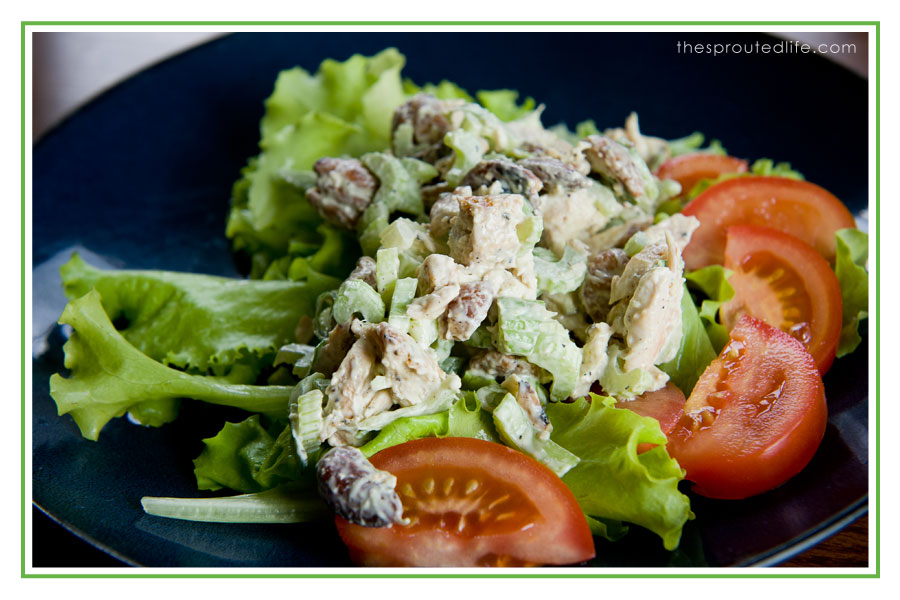
During the summer we keep our freezer stocked full of chicken breasts ready for grilling (we stock up when Earth Fare runs their $2.99 chicken breast special) and make a lot of simple grilled chicken meals. One of our summer favorites is a fresh chunky chicken salad, loaded with grilled chicken, toasted pecans & almonds, celery and green onions. It’s a simple meal, but it’s also quick (which is perfect for our busy summers) and packed full of flavor.
Our favorite way to serve it is over fresh salad greens and tomatoes, but a lot of times I make sandwiches for the kids, with toasted Udi’s gluten free bread or in a Food for Life Brown Rice Wrap. On days that we are super busy, I will grab a rotisserie chicken from Earth Fare and just chop that up (they are currently, featuring their chickens for $5 on Fridays).
chunky chicken salad – a summer favorite
Recipe Type: lunch or dinner
Author: the sprouted life
Ingredients
4 large chicken breasts drizzled with olive oil and Simply Organic Lemon Pepper or Penzey’s Bicentennial Rub. (or 6 cups chopped rotisserie chicken)
1 cup pecans
1 cup almonds
1 heaping tsp. coconut oil
2 cups chopped celery
2 green onions, chopped
3/4-1 cup organic mayo (I use Spectrum organic)
salt & pepper to taste
salad greens
roma tomatoes
Instructions
Toss chicken breast in olive oil and seasoning of choice (our favorites are Simply Organic Lemon Pepper or Penzey’s Bicentennial Rub).
grill chicken, set aside to cool.
Toast pecans and almonds over low heat in coconut oil and lightly salt.
In a large bowl combine chopped green onion, celery, almonds, pecans and diced chicken. Then stir in mayo, I use about 3/4 a cup, but adjust depending to how creamy you like your chicken salad.
Add salt & pepper to taste.
Serve over fresh salad greens and chopped tomatoes
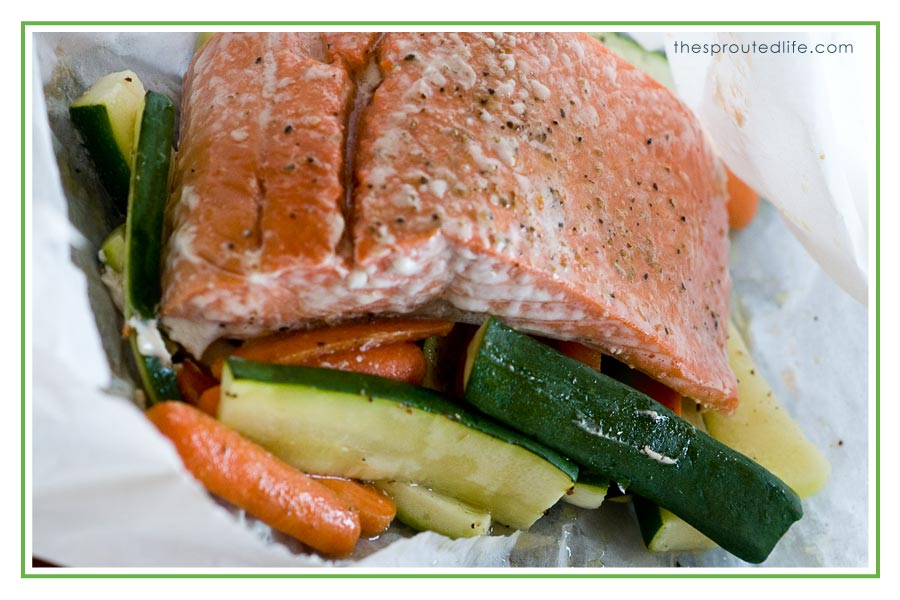
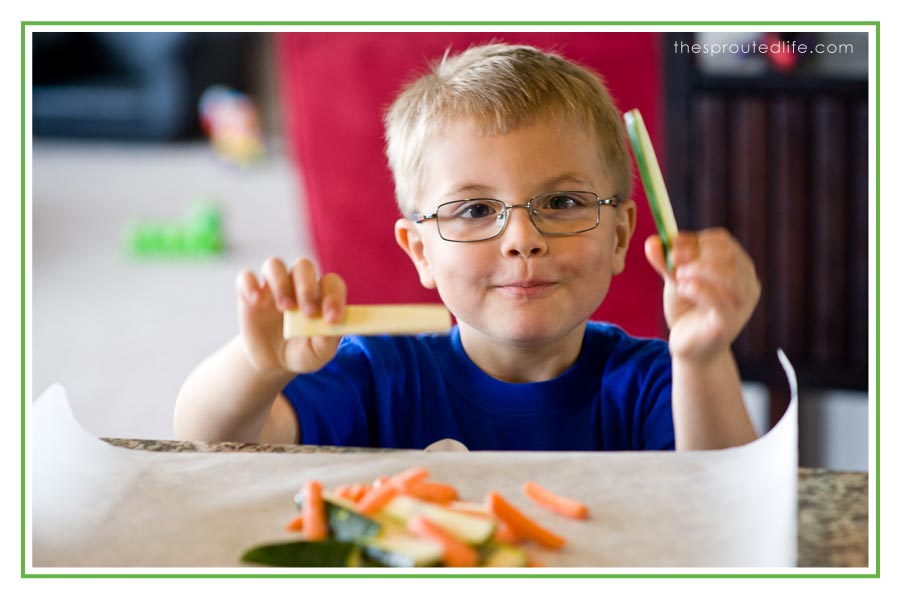
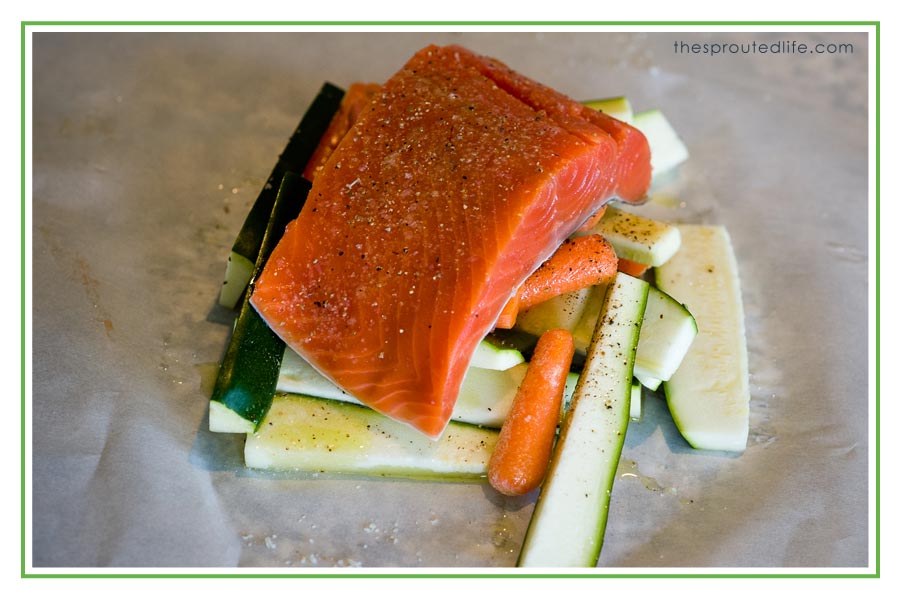
Spring and summer are my favorite times of the year. I love fresh seasonal vegetables and meals seem to be inherently lighter. A quick easy dinner that we like to throw together are baked salmon packets. The are easy and literally your entire meal is baked all together in a little parchment paper pouch. I really try to buy wild caught salmon whenever I can get it on sale and our local Earth Fare had it on sale for $8.99/lb the other day, yay! You can use any combination of vegetables but our favorite is a combination of carrots, zucchini and asparagus (of course these are missing zucchini because I forgot to buy it on my shopping trip).
The most difficult part about making this meal is keeping my 5 year old from eating all the veggies as I cut them. Seriously, these are such a simple, yet satisfying meal…perfect for busy summer nights. I was actually prepping these before my son’s baseball game so that I could just throw them in the oven when we got home.
Salmon and Veggie Packets
Recipe Type: Main Dish
Author: The Sprouted Life
Prep time:
Cook time:
Total time:
Serves: 4
Ingredients
1 lb wild caught salmon (cut into 4 equal pieces)
4 – carrots
2 – medium zucchini
1 – bunch of asparagus
(or any combination of fresh vegetables, sugar snap peas, green beans and yellow squash work well also)
olive oil
lemon pepper seasoning (I use Simply Organic)
salt & pepper
Instructions
Julienne cut all your vegetables and divide into four servings.
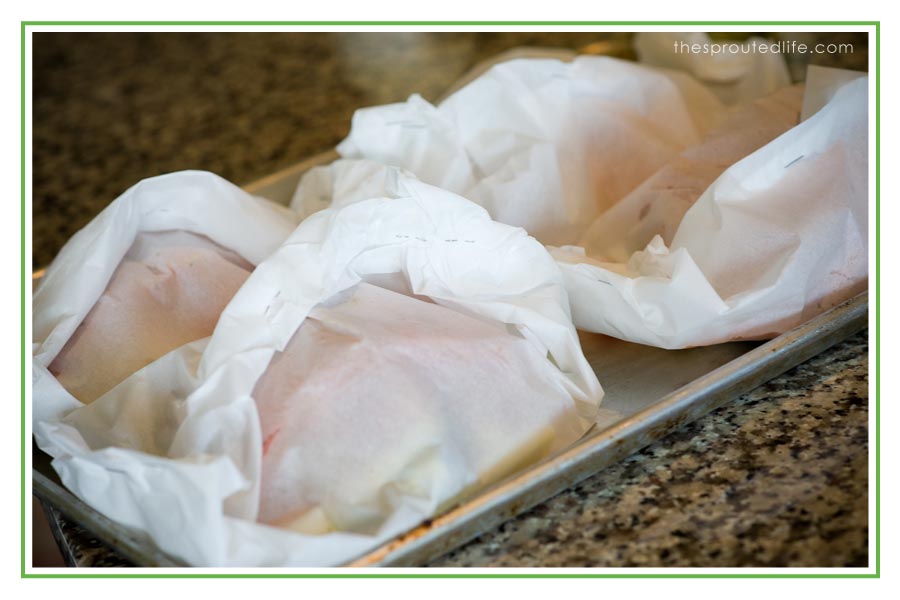
Place each serving of the vegetables on a parchment paper square, and drizzle with a little olive oil and a little salt & pepper.
Place each fresh piece of salmon on top of the vegetables and drizzle with a little more olive oil and lemon pepper seasoning.
seal the parchment paper into packets and staple shut.
back at 400 degrees for approx. 15 mins. (can vary depending on thickness of the salmon)
enjoy!
*Vegetables will still be a little crunchy, so if you like your vegetables cooked more, I would suggest blanching them for 2-3 minutes prior to baking
A few weeks ago we had dinner with some good friends, Nate & Amanda (that we don’t see often enough). Amanda loves discovering new foods was telling me about one of her favorite food blogs, called My New Roots. She loves the Chocolate buckwheat granola recipe and said that I had to try it.
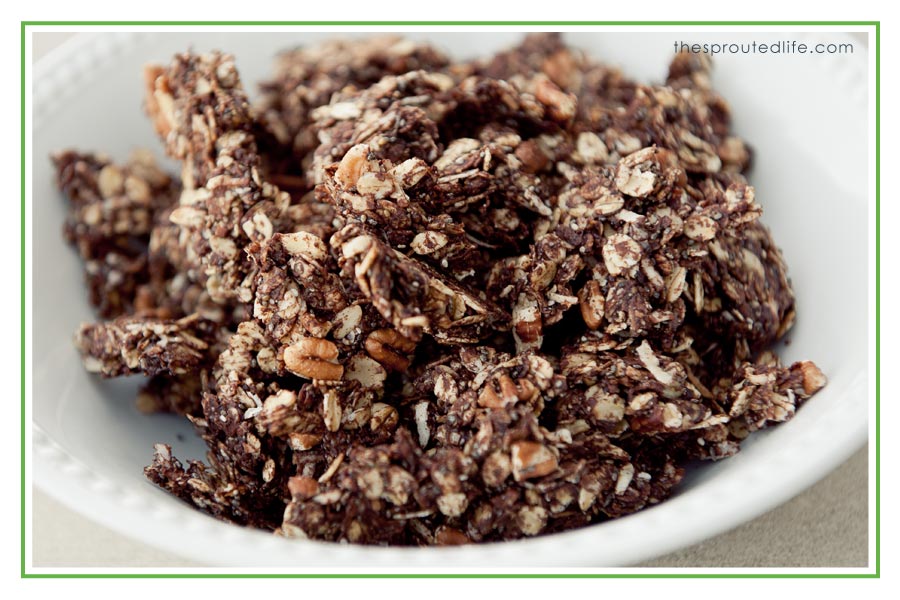
So of course the next day I decided that I had to make it…Problem, I had no whole buckwheat and no hazelnuts (two key ingredients). But I did have Gluten free oats, coconut and chia seeds, so I decided to take the basic recipe idea and make my own variation. I am certain that the flavor profile is pretty different than the original (especially since buckwheat has a pretty strong nutty flavor), but that being said…I love how the original recipe can be easily altered with ingredients that you have on hand and still taste fantastic. This granola make the perfect snack, especially if you wanted something just a little sweet. We also served in on top of our favorite local yogurt from Traderspoint Creamery.
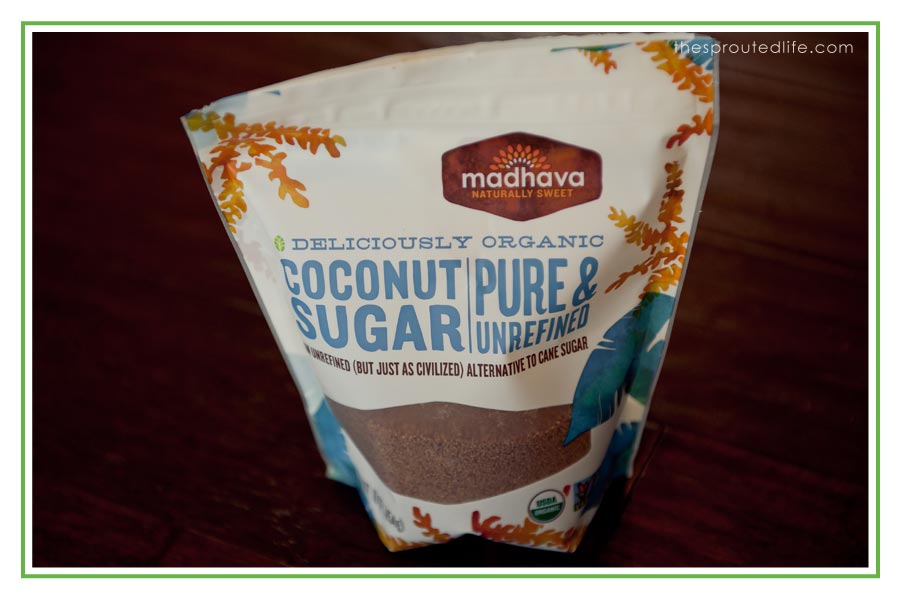
Literally, every item is this recipe I keep on hand at all times in my pantry… except the coconut sugar. Which ironically, I had just picked up a bag at our local Earth Fare because it was on sale and I wanted to try cooking with it. I love the combination of coconut sugar and maple sugar. It is probably one of my favorite sweetener combinations in baking/cooking.
Gluten-Free Chocolate Granola
Recipe Type: snack
Author: The Sprouted Life (inspired by and adapted from My New Roots)
Ingredients
3 cups gluten-free rolled oats (I use Bod Red Mill’s)
2 cups shredded coconut (flakes work also)
1 cup chopped pecans
1/3 cup chia seeds
1/3 cup ground flax seed
pinch of sea salt
½ cup organic cocoa powder
1/3 cup coconut oil
1/3 cup maple syrup
¼ cup coconut sugar
1 tsp vanilla
Instructions
Preheat oven to 325
Combine the rolled oats, pecans, shredded coconut, chia seeds, flax seeds and sea salt in a large bowl.
In a saucepan over low to medium heat add the coconut oil, maple syrup, coconut sugar, cocoa powder and vanilla. Whisk until liquid mixture is smooth.
Pour the chocolate mixture into the dry ingredients and fold them together until well coated.
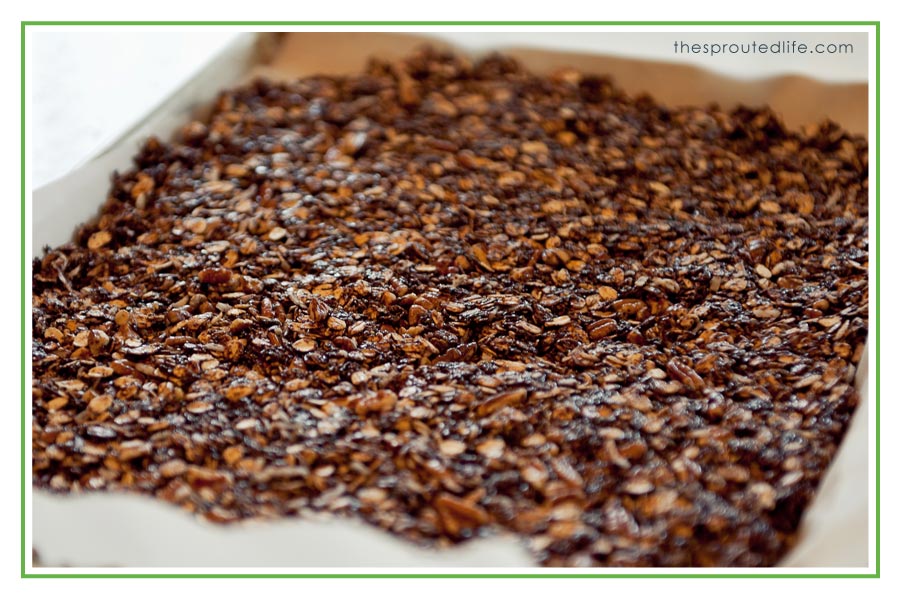
Spread the granola mixture onto a cookie sheet lined with parchment paper and press firmly to stick granola together.
Bake for about 30 minutes, stirring every 5-10 mins until everything is lightly toasted.
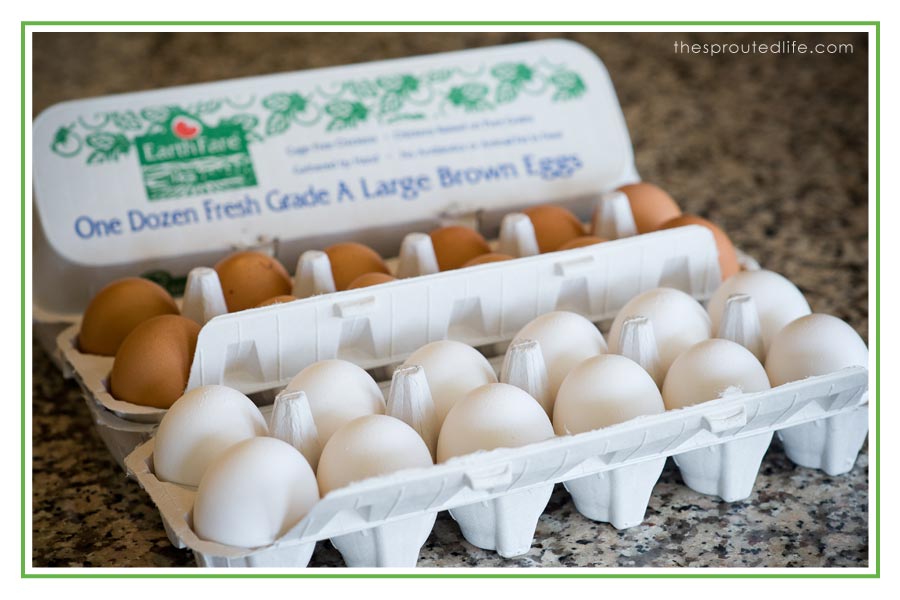
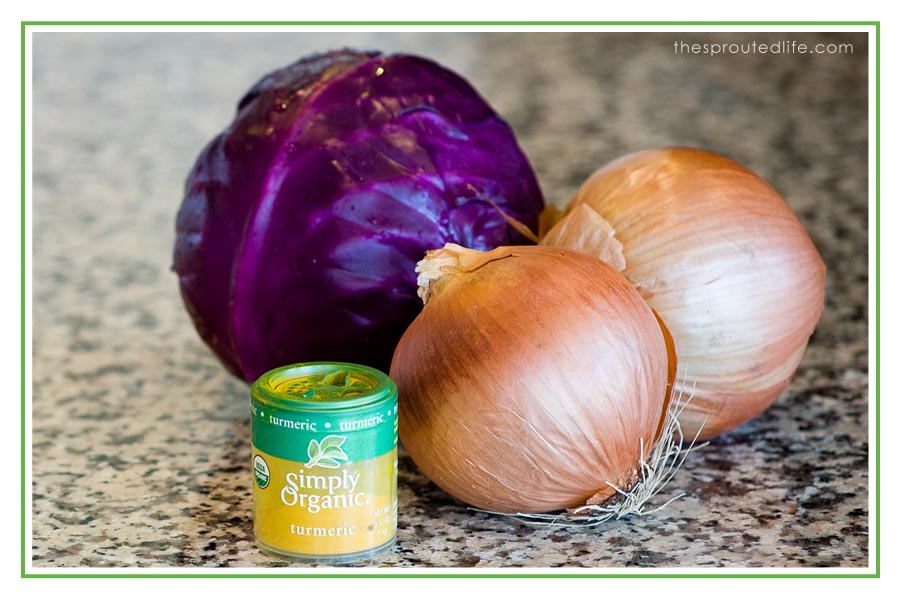
I picked my boys up from preschool yesterday and decided we needed a fun project for our afternoon, so we swung into EarthFare to grab some eggs, cabbage & onions. (Really the trip was more pre-meditated than that because I had one of their $14 of $70 coupons and had no eggs, no orange juice, one apple, no bananas and I really wanted a flank steak for dinner). Though to my little boys, the trip was all about getting supplies to color Easter eggs. I have seen Pinterest posts and Facebook posts all over the place about naturally dying eggs, so I thought we would give it a try. I bought, both brown and white eggs to experiment with, but by far the white turned out the best.
It was a super easy process.
First, I hardboiled all my eggs. My favorite method for hard-boiling is to start with the eggs in cold water, bring to a rolling boil for one minute and then remove from heat, cover and let sit for 10 minutes. Then I cool them off quickly in cold water.
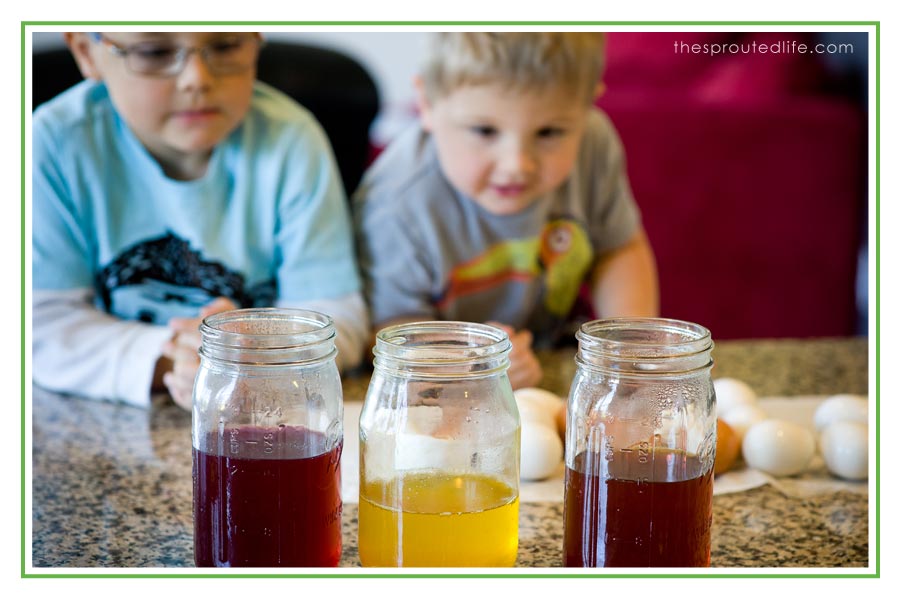
I decided to try three different dye colors. Honestly, it was a pretty cheap dye mixture, becuase you only use the onion skins and can keep the onion for cooking, I used half a head of cabbage and my turmeric was an old stale bottle jar that really needed replaced anyway. To prep I filled 3 pots with water and added my dye items. My ratio I worked with, was one cup of chopped onion skin/cabbage to one cup of water. For the turmeric, I used 1 Tbps of spice to 1 cup of water.
I then brought each pot of water/dye substance to a boil and then covered and reduced the heat and let it simmer for about a half hour. After it cooled down a bit, I strained the liquid into mason jars and added 1 Tbsp of white vinegar per cup of dye.
At this point my boys were so impatient for their eggs to turn colors. This is definitely the step that was the hardest for them because it required waiting and the eggs aren’t just instantly colored. We tried a mixture of both white and brown eggs in each jar. After we filled the jars with eggs we put them in the fridge to sit. We actually were so busy that night, that we didn’t check them until morning. In the morning, we pulled them out and lightly dried them off with paper towels.
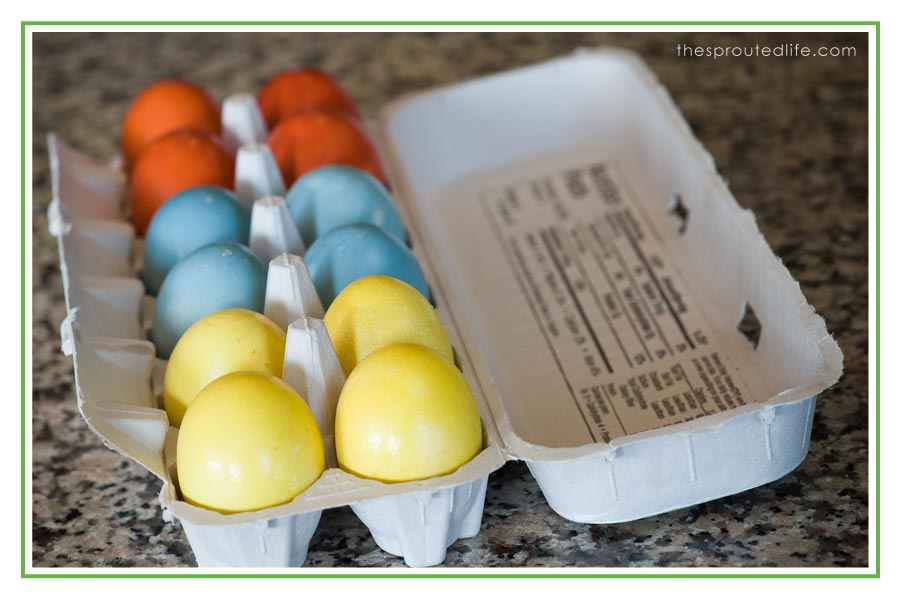
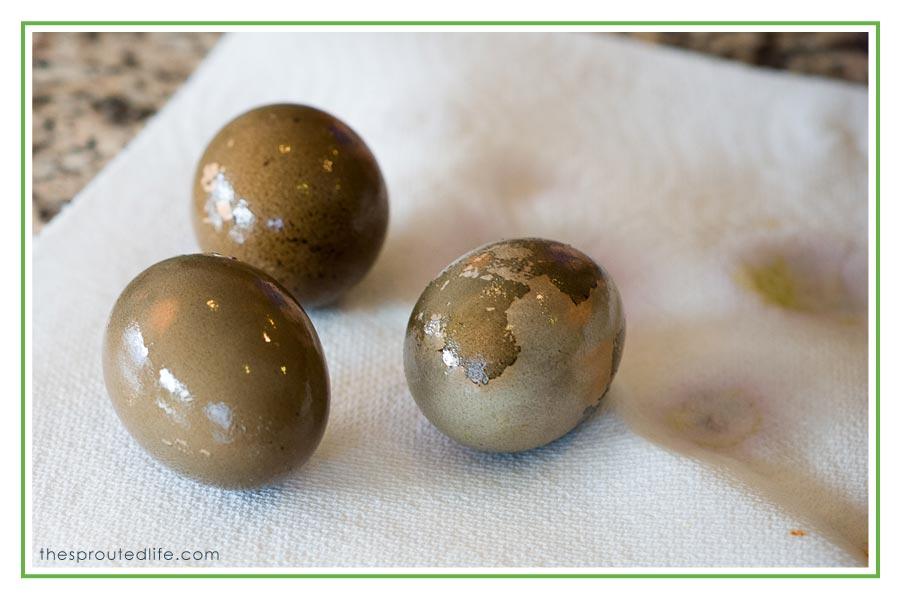
The front ones are the turmeric dyed eggs, then the red cabbage and finally the onion skins. I think the onion was by far the strongest most concentrated dye and it turned both the white eggs and brown eggs very similar in color. Though, I do think the blue ones turned out to be a really pretty color also.
I also had one batch that flopped. I had read somewhere that you definitely wanted to add brown eggs to the red cabbage dye and you will get green. Now, I am a graphic designer, have taken color theory and that idea didn’t seem like it was going to work, so I tried it anyway because I was curious…Not only are they not green, but they are splotchy messes. Next year, I will experiment with some green veggies and see what I can come up with.
Look’s like we are going to be eating a bunch of cobb salads or egg salad this week, since I have a bunch of colorful hard boiled eggs in my fridge now! Happy Easter Weekend!
Hi, I am Jennifer and I am a Functional Medicine Health Coach that is passionate about helping busy moms simplify their family & athletes’ health through clean eating & meal prep