Jul 23, 2012
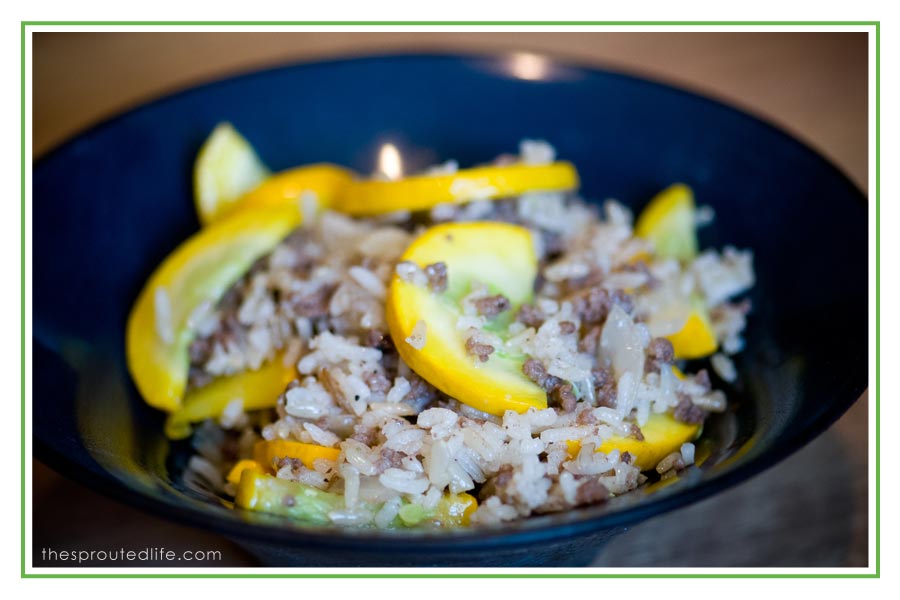
it’s moving week in our house! it feels like we have been prepping to move forever. we are temporarily moving into a basement apartment (8-12 weeks) so most of our stuff has to go into storage…which has made packing a little more challenging. needless to say, this week will be full of simple quick meals! i am still trying to eat down our pantry & freezer and every ingredient in this dish i had on hand. (the onions and yellow squash were from our CSA share last week).
we don’t eat a ton of gluten free grains, but the four main ones that we still incorporate into meals are rice, corn, quinoa and some gf rolled oats. one thing i am pretty strict on is what i cook my rice and quinoa in. i very rarely just cook it in water, but instead always try to use homemade bone broth (i freeze it in big batches). i could write a huge long post on the benefits and nutrients packed into bone broth (and after this move, i will). i drink a big mug of it everyday, but getting it into my kids is fairly challenging. i have found that cooking grains and other dishes in it, is a fool proof way to get some broth into my family’s diet. here is my quick: beef, rice and yellow squash skillet dish!
| beef, rice & yellow squash skillet dish |
#ratingval# from #reviews# reviews
|
Print
|
Author: the sprouted life
- 2 cups bone broth (i used beef)
- 1 ½ cups brown rice
- 1 lb. grass-fed beef
- 2 Tbsp. coconut or olive oil
- ½ yellow onion (diced finely)
- 3 garlic cloves
- 3 yellow squash
- salt & pepper to taste
- cook rice in bone broth (i use a rice steamer, but can easily be done on stovetop)
- in a skillet, sauté diced onion & crushed garlic in 1 T. coconut oil.
- when onion becomes translucent, add in beef and cook until brown.
- toss in sliced yellow squash and cook down for 2-3 minutes on medium heat.
- when squash becomes slightly soft add in the cooked rice, remaining coconut or olive oil.
- mix together well and add in salt & pepper to desired flavor
- serve!
2.2.6
Jul 12, 2012
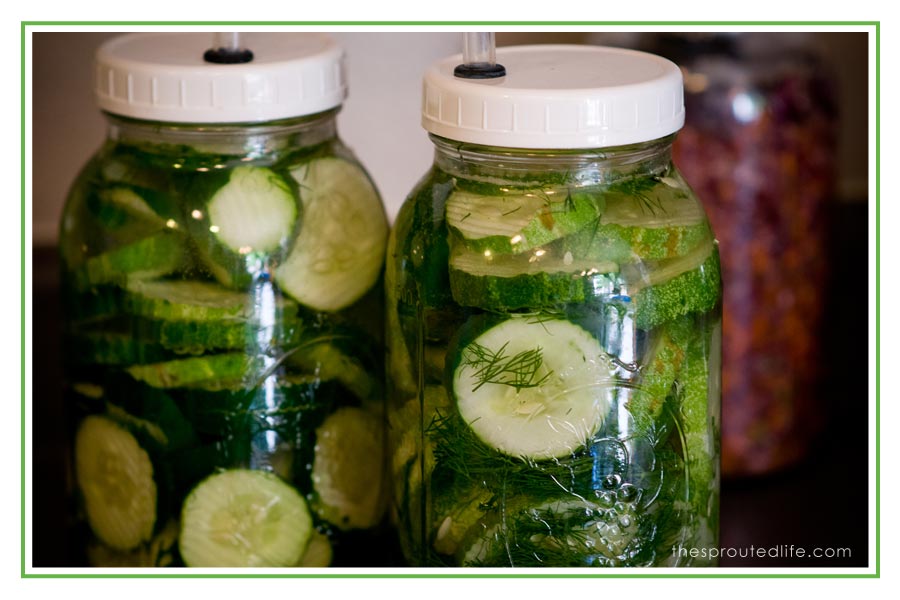
i am super excited about my 3 new jars of veggies that are fermenting on my counter right now. we got some yummy pickling cucumbers and a beautiful head of red cabbage in our CSA share last week, so i knew i needed to try some new recipes with them. i have two types of cucumbers recipes turning into lacto-fermented pickles, one is a pretty simple garlic-dill and the second has more kick with some cayenne and red pepper flakes. i will hopefully be sharing the recipes in a few days when they are done (i have no clue how they are going to taste). i also made a batch of garden dill fermented veggies, featuring red & green cabbage, a cucumber, carrots, garlic and dill. dont’ they look pretty! i can’t wait to try them.
also, this week i have been busy freezing blueberries. we try to freeze 50-70 lbs each summer and typically those won’t make it through the whole year, but that really is about all the freezer space i can give up. i wash and dry them and then flash freeze them on cookie sheets before putting in containers. we love blueberries in this house!

Jul 6, 2012
i have been a horrible blogger. between a much needed mini-vacation to the beach/dunes in michigan, shooting weddings, a large pile of design work, canning a ton of peaches (in the 95 degree heat), house & land closings and now packing for our first move to temporary housing…i have been a little busy. never fear, my husband and i have still been cooking a ton and trying to keep healthy, nourishing meals in front of our family during this busy season of our lives. so, my little blog has suffered a bit, but i do have a bunch of recipes to share (i just need to find the time to share them).
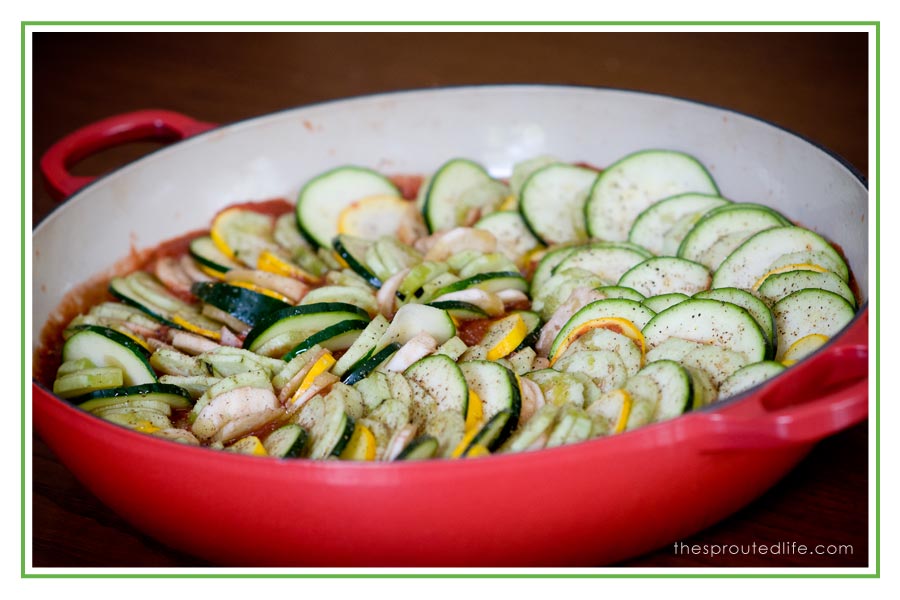
here is a family favorite side dish. our csa share last week was just screaming for me to make ratatouille from it. i had these amazing onions, a huge bunch of fresh basil, a few varieties of japanese eggplant, zucchini and yellow squash! i know this is nowhere near how traditional french ratatouille is made, but this is easy, quick and still has amazing flavor! the only main items used in this dish that were not fresh from our csa were the crushed tomatoes & garlic cloves. that makes me happy!
the picture is right before the ratatouille went into the oven.
side note: a lot of ratatouille recipes include red or yellow bell peppers in them. i think that they would make a wonderful addition. i just didn’t have any.
| simple summer ratatouille |
#ratingval# from #reviews# reviews
|
Print
|
Recipe Type: side dish
Author: the sprouted life
simple side dish, with a wonderful array of flavors!
- 2 japanese eggplants (i peeled mine)
- 2 medium zucchini
- 2 medium yellow squash
- 1 small yellow onion
- 1 can of organic crushed tomatoes
- 3 cloves of garlic
- handful of basil
- 2 Tbsp. olive oil
- sea salt to taste
- ground black pepper to taste
- parchment paper
- peel eggplant if you want (this is not necessary) and then trim ends off of the eggplant, zucchini and yellow squash
- slice the vegetables thinly, using a mandolin or knife (mine were between 1/16th and 1/8th in thickness)
- set vegetables aside
- in a food processor or vita-mix puree the canned tomatoes, basil and garlic
- layer a thin layer of sliced onions on the bottom of a baking dish
- pour tomato mixture on top of the onions and spread evenly
- starting on the outside, begin layering the eggplant, zucchini & yellow squash into the tomato sauce all the way around the pan
- drizzle with olive oil
- sprinkle with sea salt & ground black pepper
- cut parchment paper to fit baking dish
- cover loosely with parchment paper and bake at 375 for approx. 1 hour
- vegetables should be fully cooked, but not mushy.
2.2.6
items used in this recipe:
shared on: food renegade

Jun 21, 2012
we have loved our csa share (community supported agriculture) and are getting ours from {farm indy} this year.
this year is our first year and i am pretty certain we will never go back. we used to just try and make regular trips to the farmers market on saturdays, but honestly because i work in the world of photography, summer weekends are pretty hit or miss with weddings, so we never were consistent. so the ease of picking up a big box full of fresh delights each week…is amazing!
i love the challenge that i am encountering with a variety of local vegetables that i wouldn’t have necessarily picked. though we can customize out box, i am trying to stretch myself and not always cook with the same veggies. with my first box came creations such as wilted arugula, roasted kohlrabi and radishes & turnip au gratin (all three of which will be repeated in our home). Did you know that roasted radish is really good? i had no idea.
here is a quick picture of our first share (i didn’t include the huge bag of mixed salad greens – which happen to be the best salad greens we have ever eaten)
did i say i love my csa?
so my first creation was slightly sweet, wilted arugula with toasted pecans, topped with raw cheese. i like arugula in salad, but i knew that it can be pretty bitter and wasn’t sure how my little boys would do with it. that is where the honey came in. i figured adding a little sweetness to help balance the bitter may convince a 17-month old and 3-year old that this was good. it actually worked, though i did have to give a long, drawn out explanation to my 3-year old about the sweet, honey sauce i made to convince him to try it.
next time, i will cut off the stems on my arugula. it was a little tough and the stems were definitely bitterer. I may also cut the pieces as they were pretty big bites.

| wilted arugula with toasted pecans {sweetened with honey} |
#ratingval# from #reviews# reviews
|
Print
|
Recipe Type: side dish
Author: the sprouted life
- 1 large bunch fresh arugula
- ½ c. pecans
- 2-3 Tbsp. olive oil or coconut oil
- 2 garlic cloves
- 2-3 Tbsp. honey
- pinch of unrefined sea salt
- on medium-low heat toast pecans until light brown in oil of choice
- when pecans begin to brown, add in finely chopped garlic & sauté for about a minute
- stir in honey & arugula until evenly coated.
- heat on low until arugula is fully wilted (just takes a few minutes)
- add sea salt to taste
- serve immediately and top with raw shredded cheese (feta would be good too)
2.2.6

Jun 11, 2012
our family has cut back on the amount of gluten free grains & seeds that we eat dramatically, but in attempt to eat through our pantry (before we move) we have been consuming more quinoa and rice than typical. i have been making a list of ingredients i have on hand and really trying to use them up instead of running to the store. one complete pantry/freezer dumping dish is this black bean quinoa salad. the nice thing about it, is that it can be eaten hot or cold, making it very versatile.
though i would like to say that i always “properly prepare” my grains/seeds by soaking and sprouting first…it doesn’t always happen {i really do believe in the practice of soaking and sprouting…and i’ll share more on why in another post}. one thing i have been pretty strict about is that if i am cooking a rice or quinoa for a meal, that i always cook it in homemade bone broth instead of water. Not only for the amazing amount of nutrients/minerals found in bone broth, but also for the depth of flavor that it adds to a dish. you can use beef or chicken, but since i find that i use my homemade chicken broth so much faster, i typically opt for beef broth in this recipe.
every single item in this recipe, i had on had, making this a quick, flavorful, budget-friendly meal.
| black bean quinoa salad (hot or cold) |
#ratingval# from #reviews# reviews
|
Print
|
Recipe Type: entree
Author: the sprouted life
black bean, corn & quinoa mexican style salad
- 3 c. of homemade beef bone broth (chicken works also)
- 1 ½ c. organic quinoa
- 1 medium onion
- 2 Tbsp. olive oil
- 3 cloves of garlic
- 2 pint jars of black beans (we can our own, but two 14.5 ounce cans would work)
- 1 can of tomatoes with green chilies
- 2 cups frozen organic corn
- 2 tsp. cumin
- 1 tsp. coriander
- splash of cayenne
- sea salt & pepper to taste
- in a stockpot, bring 3 cups of broth to a boil and then stir in dry quinoa
- boil for 1 minute than reduce heat to low and cover until all liquid is absorbed (approx. 15-20 minutes)
- stirring occasionally
- while quinoa is cooking, finely chop onion and garlic and sauté in large skillet, over medium-low heat
- when onion is translucent, add in drained black beans, can of tomatoes with green chilies and frozen corn, stir in and heat through
- mix quinoa into skillet and add seasonings (cumin, coriander, cayenne, salt & pepper)
- measurements of seasonings are a rough estimate, as i always create this dish to taste and adjust accordingly
- can be served warm or eaten as left-overs cold
2.2.6
May 22, 2012
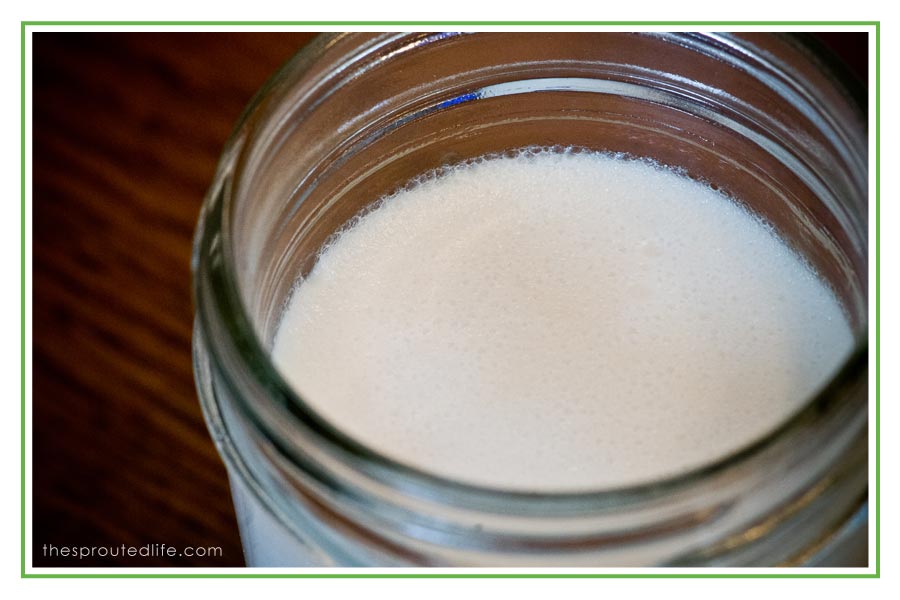
i first attempted making my own yogurt about 2 years ago, when i was completely dairy free. though we have now reintroduced some dairy into our home, we have still held onto this recipe as one of our weekly favorites. at first, i was pretty intimidated at the thought of making yogurt, but honestly it is really easy and takes very few ingredients. we ferment ours typically about 18 hours, which yields a creamy, slightly sweet, slightly tart final product. if you are used to the sweet store bought yogurts, the tartness of homemade yogurt can be a slight adjustment, but it is so good!
the basic ingredients are coconut milk, honey, vanilla, a probiotic starter and some thickener (i typically use agar-agar).
thoughts on coconut milk:
we typically use native forest organic canned coconut milk. mainly because the cans are bpa free. the downside is that there is guar gum as a stabilizer and i am not a huge fan of it. this week, i am making my own coconut milk from dried organic coconut flakes and i am going to try that in our next batch of yogurt. i will let you know how that turns out!
thoughts on thickener:
we have found that agar-agar is our favorite thickener for the yogurt. i have tried tapioca starch
 , arrowroot
 & guar gum
 and all of them work fine also. i am planning on trying to use plain gelatin
 sometime, but haven’t gotten around to trying it yet.
thoughts on yogurt makers:
i have a little yogurt maker by waring , i got it for about $25 at tuesday morning (a random discount store) we have here. the one thing i did right away was toss all the plastic containers that came with it (i hate bpa) and instead it fits 7 half-pint mason jars perfectly. the nice thing about using a yogurt maker is that it keeps the temperature perfectly consistent at 105 degrees and i can just set the timer and forget about it. a lot of people use their crock-pot, or oven with light on, or excalibur dehydrator
 , so really it is just preference. a yogurt maker is actually not necessary to culture yogurt.
other hints:
- make sure you sterilize jars and utensils before beginning. this is important! (i will show in another post, how to know if your yogurt is bad)
- a good yogurt starter probiotic is gi-prostart , it is dairy free and works well with nut and coconut milks
- a candy thermometer is perfect for making sure you are at the right temperatures (to high of heat will kill your probiotic culture)

| coconut milk yogurt |
#ratingval# from #reviews# reviews
|
Print
|
Recipe Type: breakfast
Author: the sprouted life
slightly tart, slightly sweet coconut milk yogurt
- 3 cans organic coconut milk (full fat)
- 3 Tbsp. raw honey
- 2 tsp. agar- agar
- 1 tsp. vanilla
- 1/8 tsp of probiotic starter (I use GI-Prostart)
- in a saucepan heat coconut milk & honey (stirring constantly)
- bring up to 185 degrees and then whisk in agar-agar or thickener of choice
- remove from heat and add in vanilla
- at this point i pour my mixture into my vita-mix and blend on high to really whip in thickener (but this is not a necessary step)
- allow too cool down to 105 degrees (quicker is better, hint is to set pan in ice water bath)
- as soon as mixture reaches 105 degrees whisk in culture (probiotic starter)
- pour contents into sterilized mason jars (recipe yields 7 half-pint jars)
- place in yogurt maker and set for 12-18 hours (depending on desired tartness)
- when yogurt is done fermenting, it will still be fairly thin until it cools off in the refrigerator
- cap jars and refrigerate (keeps for 7-10 days)
- serve with fresh fruit or granola
2.2.6
shared on: monday mania, slightly indulgent tuesdays, fat tuesday, allergy-free wednesdays & pennywise platter